 I've been experimenting with sewing on card stock, inspired by the many fantastic cards and LO's by Teriberi and others on the Cricut Message Board. This stitched album is made using the new Close to my Heart (CTMH) Boom-Di-Ada patterned paper and cardstock. I love this stuff! It's SO darling (no pun intended, LOL).
To make the tabbed album pages, I used card  stock in two colors (from the Boom-Di-Ada pack). Three tabbed pages are inside the album, the fourth tabbed page serves as the wrap-around album cover. As you can see from the picture at left, this album has a spine, onto which the individual pages are sewn. The title on the spine "On Our Lake" was cut using Cricut's Zooballoo (ZB) cartridge (3/4 inches tall, and shadowed).
 The tabbed pages are cut using the Fabulous Finds (FF) cartridge, at 7 inches Real Dial Size (RDS). Two pages are filefld1 cut using blackout feature, two pages are filefld2 also cut using blackout feature. I didn't want the tabs to stack on top on each other, so by using both filefolder cuts I avoided that problem. Here are a few more pics of the album pages before scoring and
  stitching them to the spine. At left you can see the inside three tabbed album pages after all 3 were cut. And at right you can see the three pages laying on top
 of each other with the tabs lined up on the right.
(The wrap-around cover is not yet cut.)After I cut the 3 inside album pages I worked on making the spine of the album. I cut a piece of cardstock 1 inch wide and 7 inches long. Onto this spine I needed to stitch all three album pages. The picture at right shows the spine. With a pencil, I marked three stitching lines across the spine. One mark was in the middle of the i nch-wide strip, at 1/2 inch. The other two marks were 1/4 inch from either edge of the spine. So, I ended up with 3 lines down the length of the spine, at 1/4 inch, 1/2 inch, and 3/4 inch.
Next, score each of the three tabbed album pages down the exact center line of the page (see picture at left). Alternate the page colors and stitch each page to one of the lines you have drawn onto the one-inch wide spine. Since I had two pages of hollyhock and one page of sweet leaf, I started with the middle page (sweet leaf) and matched the score line in the middle of the page to the drawn pencil line in the middle of the spine (at 1/2 inch). Sew straight down the spine, matching the score line to the pencil line all the way from top to bottom. Your first page is sewn on!

 Next, close the middle page you have just sewn on so that the pencil line on the right side of the spine shows. Pick up a second page and carefully sew it to that mark, matching the score line to the pencil line as you stitch. Then, in order to sew your third page, fold the other two pages over to the right side. Stitch page three along the left pencil mark on the spine, again matching the score line in the center of the page to the pencil mark on the spine. All three pages are now stitched to the spine. Here's a picture of how this will look when you are done (at right), showing the spine with the three pages stitched to it. The second picture shows the pages from the front.
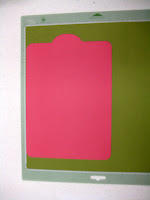
Now it's time to cut the album cover. You will cut most of it on the Cricut using the same filefld1 cut you used to make some of the album pages EXCEPT you will extend the width of the paper by one inch (to make room for that one inch spine). So, you will still cut at 7 inches Real Dial Size (the height of the album) but you will stop the cut and manually add one inch to the width of the page, on the side opposite where the tab is. Here is a picture that shows the album cover, and this page is one inch wider (not taller!) than the width of the other album pages. Just for purposes of illustration, I have set an "extra" spine on this album cover so you can see that it needs to be that one inch wider to wrap around the spine. To do this, stop the Cricut from cutting that left side (opposite the tab). I used one of my other album pages, laid it on top, slipped it to the left one inch, traced around the left side of it onto the green album cover page, and then cut it with scissors.
 After cutting the album cover (it's just like the album pages but it is one inch wider), I drew a pencil line down the exact center of the paper (see right, the pencil is pointing to the center line). You will be adhering the exact middle of the spine (the 1/2 inch mark where the middle page is stitched) to the pencil line you just drew on the album cover.
To a dhere the spine to the album cover I used the adhesive from my ATG gun. As you can see in the picture at left, I ran about three "lines" with my ATG so that the entire spine was well covered with adhesive. Just "open" the album pages and page them face down on your table, so that the "back" of spine shows, and apply your adhesive. Next you will adhere the spine to the inside of the album cover. Lay the cover "face up" so that the pencil mar
 k you made down the center line shows. Take the rest of the album, turn it over so that the sticky spine is face down, and carefully line up the center line of the spine to the pencil line that is on the album cover. Your album will now look like the picture to the right.
The next step is to score the album cover so that it will fold nicely around the spine. To do this, lay the album down flat on your table and make two score lines, running each one right next to the edge of the spine (one on the left side of the spine, one on the right). Here's a picture with a pencil pointing where you will make the score line - right where the two colors of card stock meet. Do this on each side of the spine.

To cover the raw edge of card stock where the spine meets the album cover, I used a piece of coordination ribbon (see pic at left). You could also use a strip of the matching patterned paper. I liked the finished look that the ribbon gave, and it was just wide enough to cover that edge up. I used ribbon on both of the spine's edges.Youralbum is now complete and ready for embellishment! Here's a few pictures of the completed album.

 Do you want to use this design to teach a class?
 You are welcome to use it if you add this blurb in its entirely to your written instructions:
Designed by Sue Painter for www.scrapbookspirit.com, May, 2008. Used with her permission.
I'll show you how to embellish the album cover in the next blog post. I hope you have a lot of fun creating your tabbed and stitched spine album!

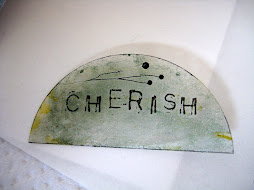
 ge at 3/4 inch from patterned paper (CTMH's Boom-Di-Ada paper and card stock). The letters are shadowed using hollyhock card stock, which matches some of the inside pages of the album. To help the eye distinguish between the words "On Our Lake" I put a dot of bling between each word. (The bling was from some Heidi Swap bling I had on hand, which matches the hollyhock colored card stock.)
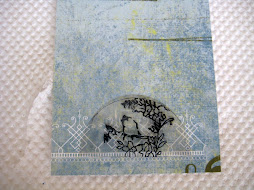
 al Size (RDS), from patterned paper. It is backed with the yellow from the Boom-Di-Ada collection. In the center I used a patterned chipboard flower from Prima with the CTMH fiber tied through the button holes. I used the center part of the Accent 46 cut to make the little flower that is on the "vine" and put a dot of bing in the flower's center. The two "vines" are Accent 20 (using the shift key) cut at 2 inches RDS.
  's a pic of the inside cover and first page of my tabbed album: I used the Spiral from Accent Essentials (cut at two inches RDS) on the corner of the top left picture on the left page. The waves on the bottom of the page are from the Going Places cartridge and are cut at 2 inches RDS.


.gif)