Showing posts with label stamping. Show all posts

Monday, July 28, 2008

Altered Art from the Medicine Cabinet

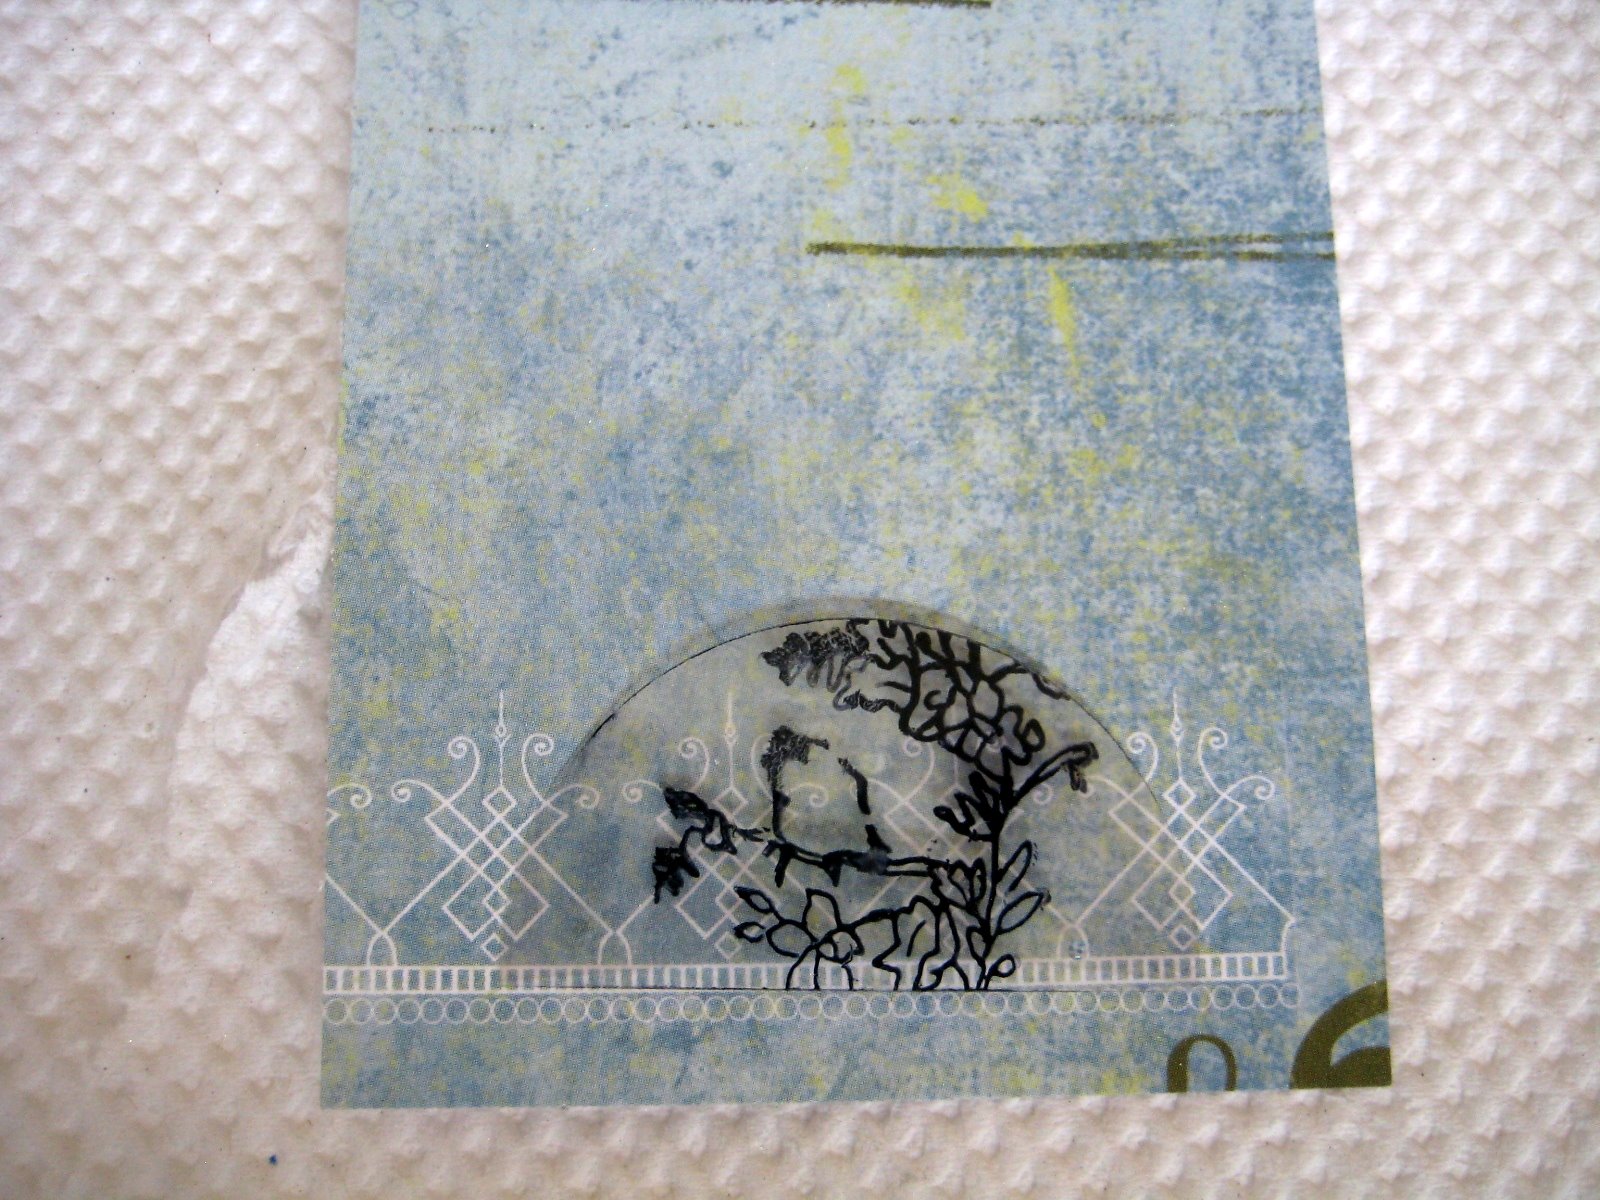
You know you are a true scrapper when everything you touch is looked at with wondering eyes - what could you make with that thing you are just about to throw away? For months now, I've been sticking an estrogen patch on myself twice a week, and noticing the little semi-circular clear transparent backing tabs. Perfect shape, perfect material for LO's and cards. So, I started saving the clear backing and thinking about what I could do with them.

Believe it or not, I dragged a handful of them all the way to Mexico for a week of scrapping with Janet. She laughed pretty hard at my idea to alter the perfect little semi-circles....but I thought they would make perfect little tabs. So I sat around and played - and came up with quite a list of things to do with these remains from estrogen patches.
  • Ink the edges and write words inside with a Sharpie pen
  • Use alcohol ink on one side, flip it over and add a rub-on or a stamp
  • Put perfect pearls on the back
  • Back the tab with patterned paper
  • Stamp on it using Staz-On ink and tiny patterns or designs
I'm betting YOU could come up with even more ideas for how to alter the pull-tabs from the back of estrogen patches. The question is, have you ever altered anything weirder? If so, leave a comment and let me know - we'd LOVE to see a picture! Look to the right for a slide show of my altered patch backings.

Sunday, June 1, 2008

Making Serendipity Square Paper with Recycled Christmas Card Fronts

Our June 2nd edition of The Scrapbook Spirit's e-zine (click here to be added to our e-zine list) will feature an article about making Cricut cuts on serendipity paper. Here's a tutorial on how the paper was made:
Step One: Gather up left over or about-to-be-tossed store-bought Christmas cards and tear off the fronts. (Top right picture.)
Step Two: Tear the card fro
nts up into various sized pieces and shapes. (Second picture, right.)
Step Three: Run the torn pieces through a Xyron, or use another method to put adhesive on the back side of your torn pieces. In the picture at left, you can see my torn card pieces after I have put them through my Xyron 510.
Step Four: Pick a pick of 12 by 12 scrapbook paper in a solid color that will coordinate with the
torn pieces. For Christmas, it's easy to use a green, red, or white paper. Do not use cardstock as it makes the resulting Serendipity Paper too thick to be cut easily by your Cricut.
Step Five: Begin to adher
e your torn card pieces to the 12 by 12 piece of scrapbook paper, in any random fashion. You can leave small areas of the background scrapbook paper showing through, you do not have to completely cover the background paper. (Picture at left shows my paper almost covered by the torn card fronts.)
Step Six: Once you have covered your background paper with the torn strips, you can also randomly stamp designs on top of the torn card pieces (in this case, I used two or three Christmas themed stamps and red ink.) This step is optional. The end result is to give the Serendipity Paper a more distressed, antique, or collaged look. The picture at right shows the ink pad and one of the Christmas stamps I used to randomly stamp over the torn card fronts.
Step Seven: To further give your paper a collaged, artsy look you can also randomly place letter stickers in a coordinating or contrasting color on top of the torn squares. This is a great
way to use up letter stickers you no longer want or use. Again, this is an optional step. The second picture at right shows the letter stickers I used on this Serendipity Paper. They were left over from another project and it was great to put them to good use!
Step Eight: Your Serendipity Paper is complete and is ready to trim and cut. From the back side, you'll see that your card pieces hang over the edge of the 12 by 12 scrapbook paper, but no worries, you will just trim these edges off using a paper cutter or paper trimmer.
Step Nine: Create! You can trim your paper into the tradition two inch by two inch Serendipity Squ
ares and use these on cards, tags, scrapbook pages, and altered art. You can put the 12 by 12 sheet of your paper into your Cricut (E-bug) or cut a 6 by 12 piece and use your smaller Cricut. Cut shapes out to use on cards, scrapbook pages or tags. The picture shows a snowman I cut from the Christmas Cheer cartridge with my Cricut. See our June 3rd issue of The Scrapbook Spirit e-zine for pictures and how to work with your Circut and your Serendipity Paper.

Making Serendipity Paper is like making a crazy quilt. You can use up all sorts of paper scraps and end up with interesting pattern, texture, and design. Have fun playing with your paper scraps, and be sure to send us a few picutres, we'd love to see!